
Microsoft updates make it harder for the user to disable Cortana. This is a downright invasion of privacy and collecting personal data. Yet, Microsoft does not want its users to remove Cortana. Cortana is not efficient as it fails to find what I authorize it. Disabling Cortana is a relief for your computer. It prevents Microsoft to collect your personal information. This virtual assistant is of no use anyway. Isn’t it better to disable it? But, recently Microsoft removed the simple toggle switch. There was one easy way to disable Cortana. But, after removing that switch in the recent Anniversary update. Microsoft does not want you to uninstall Cortana.
Microsoft has caused some major restrictions in its recent update. Before this recent Windows 10 update, Microsoft wasn’t that constraining. Now, Cortana launches the Microsoft browser. It ensures that it only uses Bing for your search. This was easy before the update.
We still have hacks so you can disable Cortana. You can uninstall it by group settings or through registry hack. This makes visual assistants into the search bar for searching your favorite apps. Everyone is finding ways to disable Cortana since a new update. We got you.
Method #1
Disable Cortana via Registry
Possibly, You have Windows 10 that is why you want to remove Cortana. So, you have to start all these steps on the Homepage of your Windows 10. It does not matter if you have Windows 10 Professional or Enterprise. You have to be cautious while doing these steps on your Windows 10. They can make irreversible changes in your system if dealt with wrongly. All you have to do is follow each step very carefully. Do not deviate from the steps or instructions and make changes by yourself. This will lead to a serious problem. It will work just fine if you follow each instruction rigorously.
Please follow these steps:
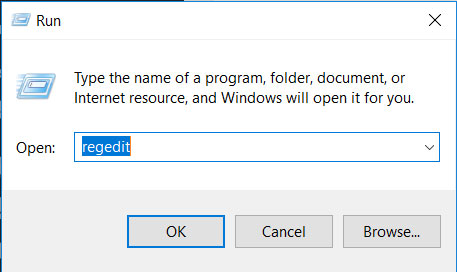
- Type “regedit” in the left corner of the search bar on your laptop. Or you can just do “Ctrl+R” on your keyboard. The run window will appear in front of you. Type “regedit” in the window and enter. It will appear like this below picture on your screen. If it does not press “enter”

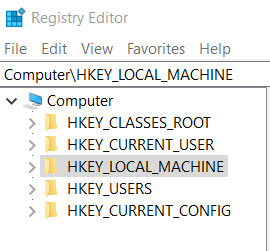
- After the “regedit” run another popup window will appear. Now Follow this: HKEY_LOCAL_MACHINE>SOFTWARE>Policies>Microsoft>Windows

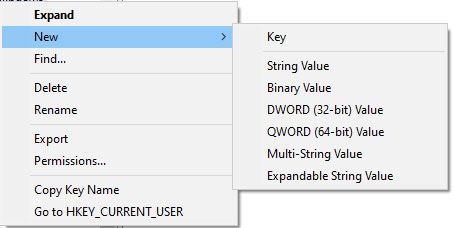
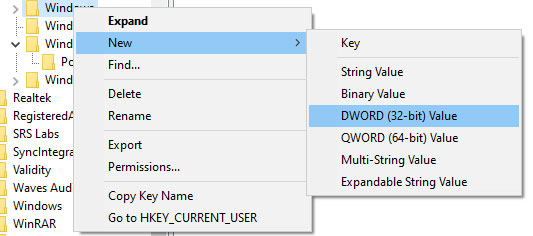
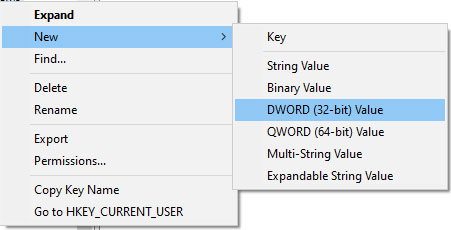
- Right-click on the window and choose “New > Key” (folder)”.

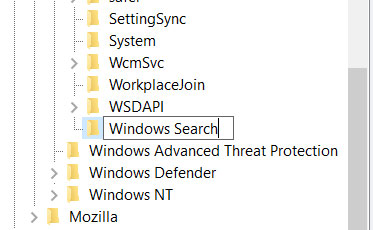
- Enter and select the New folder and change name into “Window search“.

- Click Window Search and choose New “> DWORD (32-bit) Value”.

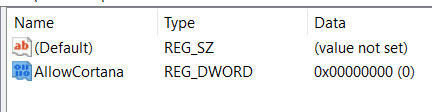
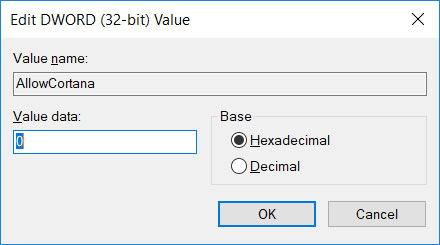
- Rename the value as “AllowCortana”.

- Then make sure that “Value Data” is set to “0” (zero) Hexadecimal base.

Make sure that after you are doing these changes, restart your computer. It will implement the changes and Cortana will be disabled.
Method #2
Disable the Bing Search in Start Menu:
The registry edit is applicable in Windows 10 version 1803. That comes in Spring Update.
- Press the “Start” or go inside the search corner bar of the laptop. Then type in “regedit.exe“.

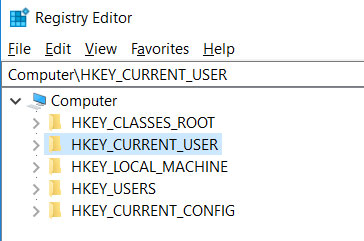
- Then move to “HKEY_CURRENT_USER and then Software which lead to Microsoft Then go to Windows > CurrentVersion.

- Then at the right side of the panel, press right and choose “New > DWORD (32-bit) Value” and Enter.

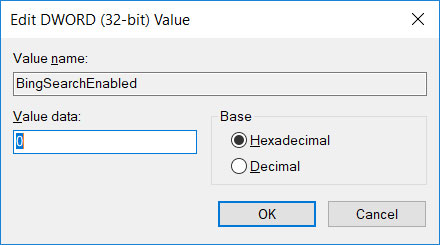
- Then type and enter “BingSearchEnabled“.

- Make sure to set the Value data to “0“.


You can also add another key. How to do it? It’s very easy, just follow the instructions. Right-click on your mouse and choose “New from which choose DWORD (32-bit) Value”. Then press enter “AllowSearchToUseLocation“. And make sure to set the Value data to “0“.
You must take care of all the checks and balances. Check if the CortanaConsent” DWORD key is available. That too, with a value data of “0“. If it is not available then you have to create it. You can reboot the system to follow the process completely.
Method #3
Disable Cortana via Group Policy:
If you are Windows 10 Professional or Enterprise user, this is for you. This hack will result in less exertion. This is considered as a powerful tool. You can uninstall Cortana with Local Group Policy Editor. This is way easy to go to your company. Make sure to add system Restore point before you start the process. It might be installed with the Anniversary update. But, try to do it manually for a better experience.
So, let’s get to the points by which you can remove Cortana. Make your Windows 10 free of Cortana with these steps.
- You have to do the same in it as Registry. Type “gpedit.msc” in the search bar at left down corner. Or you can press “Ctrl+ R” for Run window to appear. Now type “gpedit.msc” in the window and press enter.

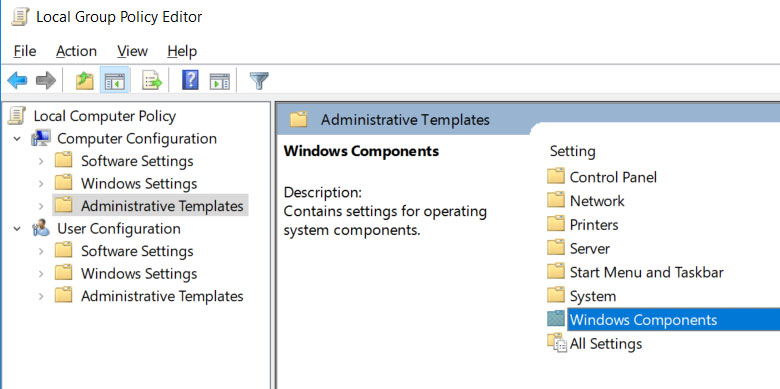
- Now Navigate to Computer Configuration. Find Administrative Templates. You will then go for Windows Components and then Search.

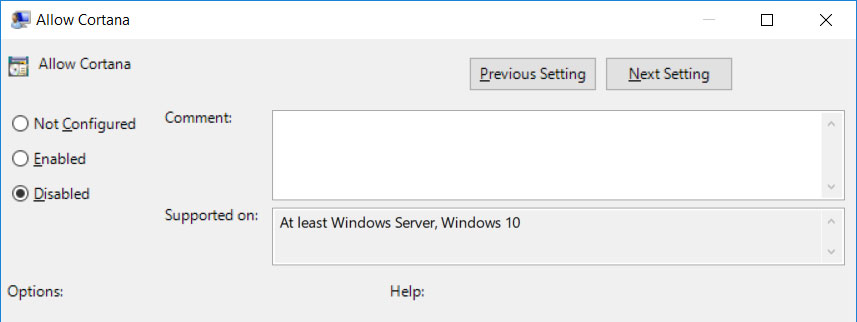
- Now Find the “Allow Cortana” settings and double-click it.
- Make sure to put the Allow Cortana option to “Disabled” and then click “OK”.

- This can only be implemented on your Windows 10 if you restart your laptop. You can close the group policy editor. Then sign out and then sign back in to see the changes.

Also Read: Best Media Players For Windows 10
Microsoft Cortana is a digital personal assistant. This can be a little too intrusive for some people. It is more especially associated with Windows 10. It takes up a lot of your personal information and does searches on your computer. It can also be useful as displaying notifications, send emails. It can also set reminders for you be it birthday, office meeting. It can all of that by using your voice.
This article’s purpose is to give a solution to turn off Cortana. It is considered an invasion of privacy. People consider it as an intruder by keeping a check on everything. They prefer it off. So, you can get benefit from this article and remove Cortana. After doing all these steps, don’t forget to Restart your computer. Then Cortana should be gone from your computer set. Now it won’t ask for “Ask me anything”. The new search box will appear and it will say “Search Windows”.
")

")